Consult this section to learn about the game's interface and main features.
![]()
![]()
![]()
![]()
![]()
![]()
![]()
 Before conducting any trade, please read the Trade Rules to make sure you don't break any.
To initiate a trade, find the nickname of the player you wish to trade with in the location's player list and click the ![]() icon, then choose Trade in the pop-up window. After you do that, the other party will receive the following notification:
icon, then choose Trade in the pop-up window. After you do that, the other party will receive the following notification: ![]()

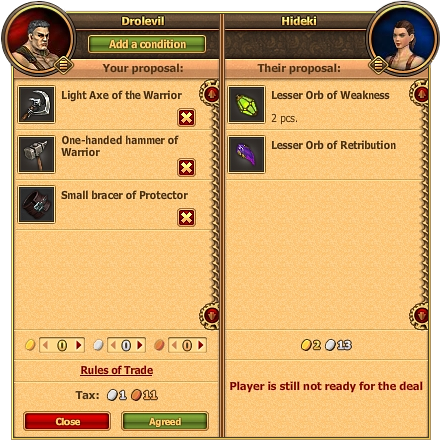
If the other player accepts your offer by clicking the respective button, the trading screen will appear ![]()
Open your Backpack and select items you wish to sell.
Attention: by completing a deal, you automatically agree with the Trade Rules.
Trade tax charged for the deal depends on the total price of traded items as well as nature of the items and their official price in the Shop.
After you click the button, a window will appear on the left. Add a condition and click the Send Conditions button to send the updated offer to your partner.
By agreeing to a deal, both parties also agree to comply with the Terms of Trade (see below). In case of a fraud on part of your trading partner, please contact one of Guardians to resolve the conflict.
Terms of Trade:
- Characters of level 4 and higher are allowed to trade with each other directly.
- Trading can only be conducted when not in combat and only when both parties are in the same location on the world map.
- A tax in the amount of 1% to 4% of the official item price is charged for each deal. The exact number depends on the total price of the traded items. When the trade only includes in-game currency, the minimal 1% tax will be applied.
You can send trade messages and offers to other players in the Chat's Trade Channel or post them in a special Forum thread, the Trade District. Posting commercial messages in any other channels than the Trade channel is forbidden. Also, please observe a 5-minute interval between your messages.
Auction
 Auction is where warriors of Adan sell and purchase items. Here you can dispose of things you no longer need as well as browse through various Auction lots for deals that best suit your interests and financial means.
Auction's main advantage is that all lots are visible to all players, regardless of their Empire, which makes the Auction prices more consistent than direct trade and reduces the risk of overpaying or underselling.
You can access the Auction from any location by clicking the hammer icon in the lower right part of the game screen. Please note that you can't use the Auction while in combat or under the effect of Prisoner Shackles punishment, inflicted for violation of Game Rules.

Viewing the Auction
When you open the Auction, you will see the default View Auction tab which allows you to quickly find the desired items by using our convenient search engine.
To the left, Item Categories are listed: Armor, Weapons, Jewelry, etc. To access the sub-category list, click the ![]() icon. The upper part of the screen contains various filtering options. You can search for items by their Quality by clicking a corresponding color:
icon. The upper part of the screen contains various filtering options. You can search for items by their Quality by clicking a corresponding color: ![]() , Level Range by manually filling in the respective fields, or Class by ticking the corresponding box (-es) - Berserk, Paladin, Witcher, or Universal.
, Level Range by manually filling in the respective fields, or Class by ticking the corresponding box (-es) - Berserk, Paladin, Witcher, or Universal.
The upper left part of the screen allows you to type the name pr part of the name of the item you are looking for.
When you find a Lot you wish to buy, click on it, set the price you are willing to pay in the lower part of the screen and use the ![]() button to confirm.
button to confirm.
If the Lot you pick has a Buyout Price set, you can pay the indicated amount to instantly close the bidding and receive the offered item (-s). To do so, click the ![]() button in the lower right part of the Auction screen.
button in the lower right part of the Auction screen.
Creating a Lot
To list an item (items) for sale, open the My Lots tab, click Choose Item, hover your mouse over the item you wish to sell and use the Lot button.
Set the starting price in the left part of the screen. You can also set a Buyout Price that a buyer can pay to purchase your Lot instantly.
You must also set the period of time during which your Lot will be open to bidding: 4, 10, or 20 hours.
Click the ![]() button to confirm your choice.
button to confirm your choice.
If you change your mind and wish to cancel the Lot, select it and click the Cancel Auction button. Please note that you will only be able to cancel if the bidding hasn't started.
Attention! When a Lot is created, you are charged a non-refundable Auction tax. This tax roughly amounts to the direct trade tax of 1 to 4%.
For a 3-hour lot, the tax will is to the direct trade tax.
For a 10-hour lot, the tax is 1.2 times the direct trade tax.
For a 20-hour lot, the tax is 1.4 times the direct trade tax.
If you sell the item (which requires at least one bid), you will be additionally charged for 1% of the selling price.
Viewing Your Bids
Use the My Bids tab to view all your current Bids. You will also see a timer that shows how much time is left until the bidding closes on the Lots that you bid on. When the countdown ends, the purchased item will be added to your backpack automatically in one hour's time. If you wish to receive the item sooner, select the respective Lot in My Bids tab and click the Collect button.
Auction History
My Purchases and My Sales tabs can be used to view your Auction history. Lost bidding is also added to this section.

Quests
 The world of Adan is inhabited by many individuals who could use the help of a skilled warrior. Helping them out by completing their Quests will earn you some handsome rewards.
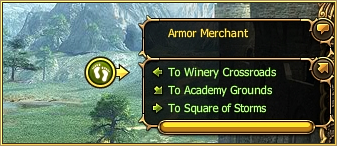
To see which NPCs inhabit a certain location, take a look at the list of names in the menu to the right marked by a speech bubble.
Keep an eye out for icons that appear next to those names. They will let you know when a character:
![]() - Has a new Quest for you;
- Has a new Quest for you;![]() - Wants to talk to you after Quest completion;
- Wants to talk to you after Quest completion;![]() - Has other useful information for you.
- Has other useful information for you.
![]() To view detailed information about your Quest activities, use the Quest Log button on the left side of the main menu.
To view detailed information about your Quest activities, use the Quest Log button on the left side of the main menu.
In the Quest Log, click on a Quest box to open a dialog screen with a short description of that Quest, its goals and rewards.
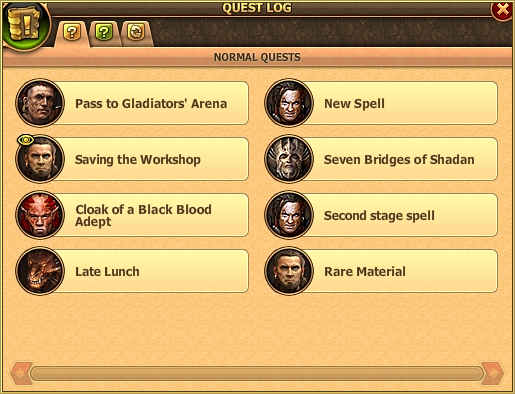
The Quest Log allows you to easily track your Quest progress.
The Quest Log contains three tabs that correspond to different Quest Types:![]() Normal,
Normal, ![]() Narrative and
Narrative and ![]() Recurring.
Recurring.
Important events like receiving a Quest, making progress towards its completion or completing it are accompanied by pop-up dialogs that are there to make sure you don't miss anything noteworthy.
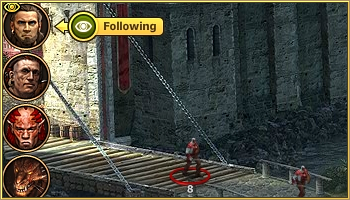
![]() Tracking Quest Objectives. To receive directions towards a certain objective, open the Quest info screen, find the objective and press the button with the eye icon.
Tracking Quest Objectives. To receive directions towards a certain objective, open the Quest info screen, find the objective and press the button with the eye icon.
Helper arrows will guide you to the location where the objective can be completed. When you reach it, the arrows will point to monsters you must fight or objects you must interact with.
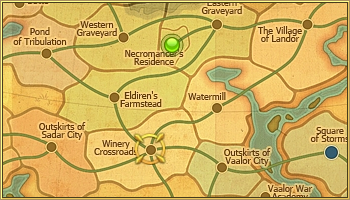
When you enable tracking, the location of your objective will also be highlighted on the world map.
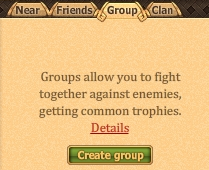
Groups
There are two ways to create a Group:
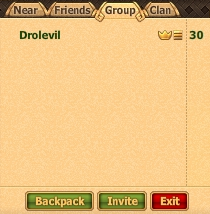
• In the Groups tab, click Create Group to start a Group of your level. You will be taken to the Group interface screen:
• In the Character menu, next to your avatar, select Create Group. If you already have a Group, a Disband Group button will be shown instead.
The Group Leader can invite players to join by by using the Invite to Group option in the the Character Interaction Menu (can be opened by either clicking the icon next to a player's nickname in the location's player list or left-clicking the nickname in the Char and holding the mouse button). You can also click the Invite button and type in the nickname of the player you wish to invite: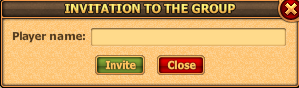
Invited players will receive the following message:

When you create or join a Group, a ![]() Group Channel tab is created that only your Group members can use. Maximum Group size is 5.
Group Channel tab is created that only your Group members can use. Maximum Group size is 5.
Loot Distribution
Groups have a collective Backpack where all the acquired trophies go. You can distribute them in three ways: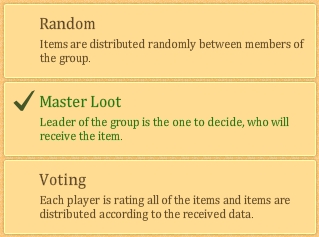
• Random – trophies claimed by the Group are distributed randomly;
• Master Loot – Leader of the Group distributes the Loot;
• Voting - members of the Group vote on each of the items, choosing from three options:
![]()
Group Leader is responsible for selecting the Loot Distribution mode.
Group Level and Transferring Leadership
![]() Level of a Group is determined by the level of its Leader. It is allowed to invite players into Group who are of an equal level or no more than two levels lower than the Group Leader. If the Group Leader decides to pass their position to another player whose level is lower, the Group level and level of players that can be invited remain the same.
Level of a Group is determined by the level of its Leader. It is allowed to invite players into Group who are of an equal level or no more than two levels lower than the Group Leader. If the Group Leader decides to pass their position to another player whose level is lower, the Group level and level of players that can be invited remain the same.
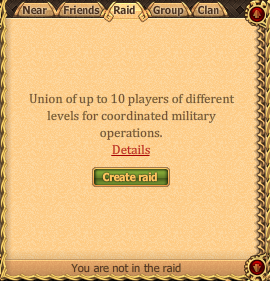
Raid
Raid is a union of up to 10 players from different Groups. Raid members are allowed to be of different levels. To create or join Raids, you must first gain level 4. Raid Channel can be used for coordination and communication between players, regardless of their level, Clan or other restrictions.
There are two ways to create a Raid:
• Clicking the Create Raid button in the Raid tab:
• Selecting the Create Raid option in the Character Information Menu. If you have already started a Raid, the Disband Raid button will be shown instead.
The Group Leader can invite players to join by by using the Invite to Raid option in the the Character Interaction Menu (can be opened by either clicking the icon next to a player's nickname in the location's player list or left-clicking the nickname in the Char and holding the mouse button). You can also click the Invite button and type in the nickname of the player you wish to invite:
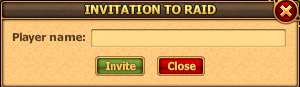
Invited players will receive the following message:

When you create or join a Raid, the ![]() Raid Channel tab appears that can only be used by members of the Raid.
Raid Channel tab appears that can only be used by members of the Raid.
Loot distribution in Raids is individual an depends on damage dealt by each member. Members of a Raid can fight monsters together by joining the same combat with the help of the Current Combats on Location screen. However, please note that in battles against Common Monster, an additional enemy will be summoned for each Raid member who joins the fight. The same does not apply to Elite Monsters.
Gifts
Gifts are a perfect way to express your sympathy, friendship or romantic feelings for another player. We made sure that our Gift system is free of the flaws of other browser games, so sending and getting Gifts in Dragon Eternity is pure pleasure.  We also offer unique Gifts which you can send to your enemies. Let them wonder and shake in fear trying to figure out the meaning of your Gift!
Sending Gifts
You can send Gifts whenever you're not engaged in a combat, regardless of your location. To do so, click the Gift Shop icon in the upper left part of the Shop screen. Browse through the Gifts in the pop-up window, select the one that best fits the occasion and click ![]() .
.
The Gift you selected will be added to the panel on the right. Type the recipient's nickname in the respective box. You can also attach a text message: a congratulation, a wish, etc. Gifts can be sent anonymously if you wish.
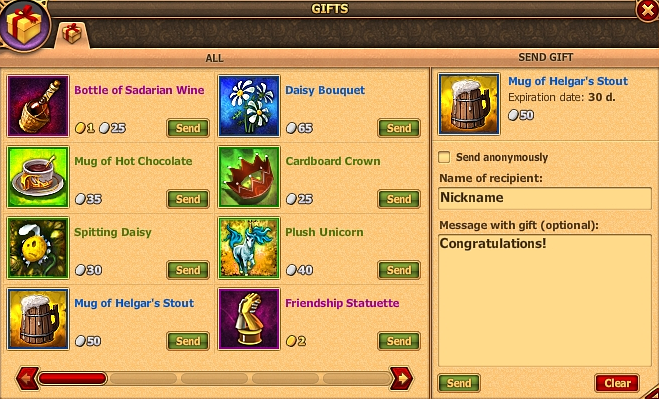
Make sure you've picked the right Gift and entered the right recipient and click ![]() .
.
Viewing Received Gifts. Sending a Return Gift
 In order to view your received Gifts, open your Character info by left clicking your Character's avatar and select the Gifts tab. When you click on one of the Gifts, the Discard and Reply buttons will appear. Click Discard if you don't like the Gift and wish to dispose of it.
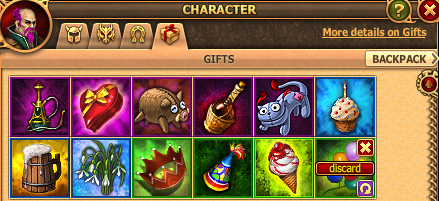
If you click the ![]() button, a screen will appear listing all available Gifts. Recipient's nickname will be automatically entered into the respective box (unless the initial gift was sent anonymously), so all you have to do is pick a Gift and click Send.
button, a screen will appear listing all available Gifts. Recipient's nickname will be automatically entered into the respective box (unless the initial gift was sent anonymously), so all you have to do is pick a Gift and click Send.
Weddings
![]() Do you feel that you're ready to tie the knot? Marrying in Dragon Eternity is very easy! Both male and female characters are allowed to propose. To do it, open the Wedding Jewelry section of the Shop, marked by the
Do you feel that you're ready to tie the knot? Marrying in Dragon Eternity is very easy! Both male and female characters are allowed to propose. To do it, open the Wedding Jewelry section of the Shop, marked by the ![]() icon.
icon.
When you find a Ring Set that you like, use it and type the nickname of the character you wish to propose to in the pop-up window. Then click Apply.


If your beloved one says yes, the Ring Set will disappear from your Backpack. Instead, Wedding Rings will be added to the Gifts for Player section of yours and your betrothed's Character info.
Also, a ring icon will appear in the same screen. Hover over it to see the nickname of your betrothed or click on it to open their profile.

In the sad case of being rejected, you will keep the Ring Set and can try again later. And if your marriage doesn't work out, divorce is also a simple procedure. All you have to do is purchase the Divorce Papers, hover over them in your Backpack and click the Divorce button. You don't need your other half's approval to do it.